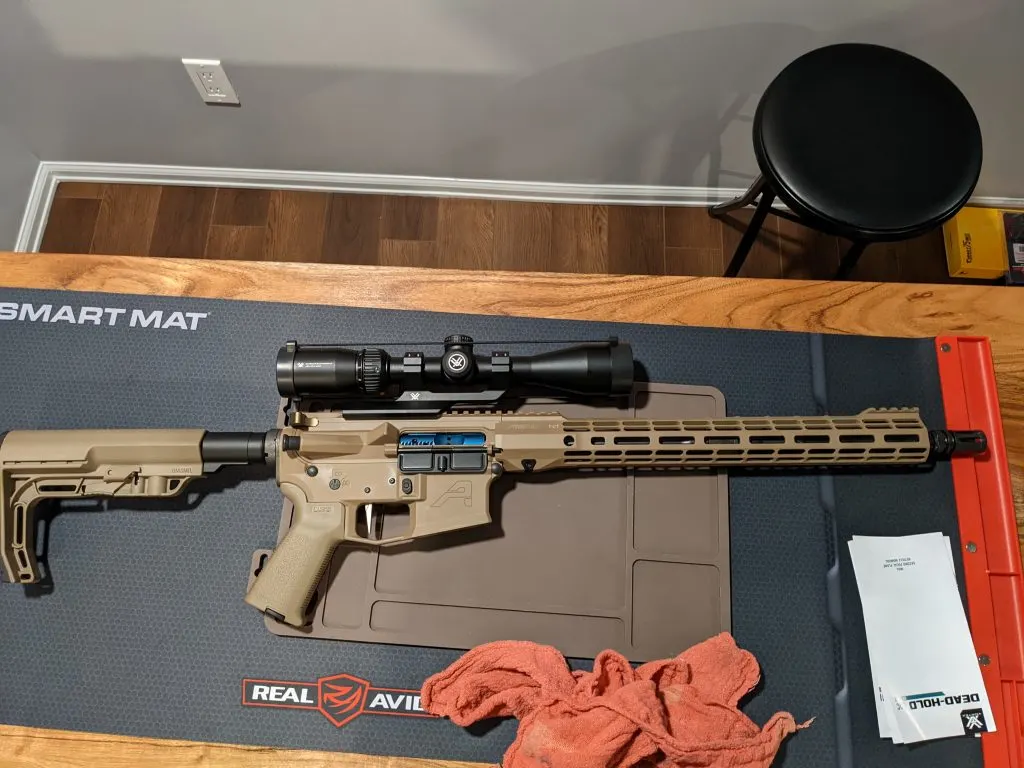
Building an AR-15 can be a daunting task especially if you’re new to the platform. There’s a certain order you need to put the parts together to have a successful build and the list of parts needed can get pretty long.
Here I will document an AR-15 build I did from start to finish, take from it what you need to get started. Keep in mind there are other ways to go about doing a build, but this is a general guide from an experienced AR builder and military gunsmith.

Tools Needed To Build an AR-15
Having an area to build with a work bench, vise, and the tools you need nearby is a huge benefit, but not always required.
I’ll make a list of the tools required as a guide below. I’ll also list the tools that aren’t absolutely necessary, but are helpful. That way you can decide what you’re willing to spend the money on.
Tools required to build an AR-15:
- Armorers Wrench – castle nut, muzzle device
- Punch Set – various pins and detents
- Vise – barrel, handguard, buffer
- Torque Wrench – barrel, handguard, buffer
- Hex/Star Wrench Set – depends on parts
Tools that help build an AR-15:
- AR Bench Block – for installing/removing pins
- Upper/Lower Vise Block – barrel install
- Brass Hammer – various pins
- Roll Pin Holder Punch – gas block
- Flat Head Screwdriver – detents/springs
I’ve made it work without using the second list there, but I don’t recommend it. For example you can rig your own vise grips to hold your upper in place, but you risk damaging the upper and it’s so much easier having the right upper and lower vise blocks.
Parts Needed To Build an AR-15 (Full Parts List)
The AR-15 platform is nice to work with because it’s basically split into two major parts, the upper and lower receivers. I’ll list the parts out for each to keep things simple.
I’ll typically use sites like OpticsPlanet, PalmettoState, and Brownells to find all the parts needed to build a complete AR-15.
The lower is the easy part of the two, but you will need a background check or to finish an 80% lower. I like to upgrade the trigger portion of a lower parts kit, but it’s not necessary.
AR-15 Lower Parts List:
Here’s a video I made milling out an 80% AR-10 lower receiver so you can see what’s involved.
Keep in mind, it’s cheaper to just buy a completed lower, even with the required background check.
The upper receiver is where most of the firearms work is done. A quality barrel and bolt are probably the most important aspects of a good AR-15 rifle. The upper receiver also holds the handguard, gas system, and muzzle device.
AR-15 Upper Parts List:
- Upper Receiver
- Barrel
- Handguard
- Gas Tube
- Gas Block
- Bolt Carrier Group (BCG)
- Charging Handle
- Forward Assist
- Dust Cover
- Muzzle Device
Usually a first time AR builder will get a Completed Upper Receiver, if not make sure to buy all Mil-Spec parts. That way there’s no mismatch and everything will go together properly. The AR-15 is one of the most customizable platforms and most of the parts available work with each other.
I’ll typically use sites like OpticsPlanet, PalmettoState, and Brownells to find all the parts needed to build a complete AR-15.
Assembling an AR-15 Lower Receiver
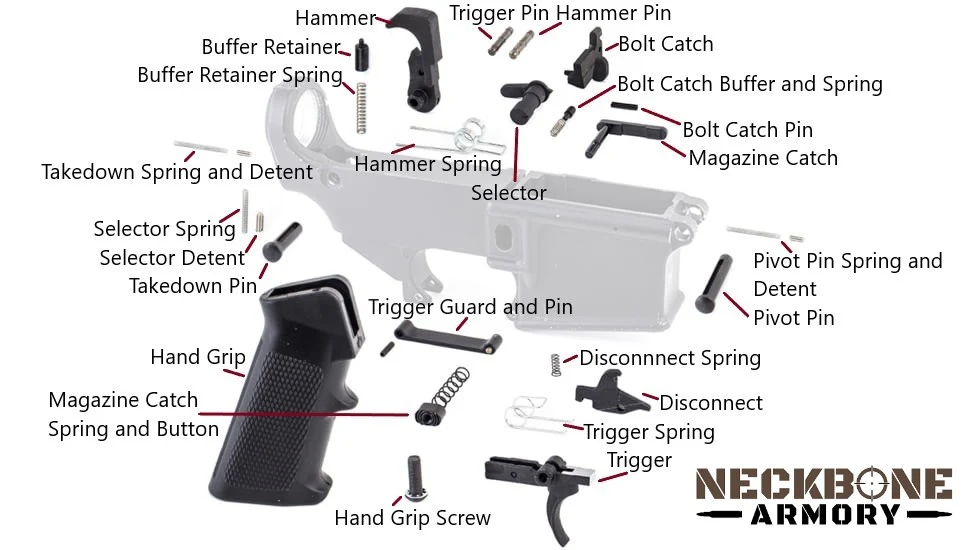
The lower receiver contains the trigger assembly, lower parts kit, buffer assembly, and hand grip. The lower parts kit includes the bolt catch, mag release, safety selector, and trigger/hammer depending on the kit you get.
Here’s a labeled picture of a standard lower parts kit to help with assembling, feel free to download or print out for yourself:

Aside from getting a quality barrel and BCG for the upper, the trigger is the most commonly upgraded part on an AR-15. It will make your shooting experience better so I usually start the build with a nice trigger rather than upgrading later.
I suggest Rise Armament, Timney, Geissele, or CMC to start with a nice trigger. All these brands can be found on OpticsPlanet and Brownells websites.
Here’s a video where I show how to assemble a lower receiver from start to finish:
Assembling an AR-15 Upper Receiver
Many new builders like to start with a completed upper for their first build. Which are easy to find online, but then you don’t get the customization from picking out your own barrel and gas block etc.
The upper requires special tools like a torque wrench to install the barrel and possibly a special size crow foot wrench depending on what barrel nut your handguard comes with. That’s why many like to purchase a complete upper.
Start your upper build with an upper receiver, BCG, charging handle, forward assist, and dust cover. All these parts can be found online at OpticsPlanet, PalmettoState, and Brownells.
I like to buy an upper receiver that already has the dust cover and forward assist installed. The important part is picking my own barrel and BCG.
Here’s a quick video I made showing how to install a dust cover if you want an upgraded version:
The BCG (bolt carrier group) is what holds your bolt assembly and firing pin. These parts are important for the quality of the build so get a decent BCG. I recommend buying an entire BCG assembly already together rather than trying to assemble yourself. The gas key on the BCG alone is a headache to install.
Here’s a quick video showing how to install the charging handle and BCG:
If you plan on running an optic with magnification or any optic that will hang over the charging handle, I suggest getting an extended latch charging handle of some kind to make using the weapon easier.
AR-15 Barrel Install
The barrel is probably the most important part of the build. The most important barrel lengths are 14.5″ (think M4 that the Army uses) and 16″ to avoid SBR territory. For more on barrel lengths check out this Best Barrel Lengths article.
You’ll need a barrel nut which usually comes with the handguard you pick and a torque wrench. Sometimes you also need a crows foot or special wrench to tighten the barrel nut depending on the manufacturer.
The handguard, barrel, and gas system all get installed together kinda. You have to make sure your gas block fits under your handguard, and that your bas block size will fit your barrel diameter.
For more AR gas system info check out this AR Gas Systems article.
So make sure when buying your barrel you get the right gas system compatibility depending on which gas system you’re going with. For example, a carbine length gas system spec barrel will require a carbine length gas tube.
Some quality barrels at a good price are Faxon, Ballistic Advantage, Criterion, and can be found on OpticsPlanet, PalmettoState, and Brownells.
If you have the money and want to top tier stuff, check out Rainier Arms ultramatch and Christensen Arms carbon fiber barrels.
Here’s a video I made showing how to install a barrel onto an upper receiver:
Assembling an AR-15 Gas System
After the barrel is installed onto the upper receiver, but before you finish installing the handguard, you have to put in the gas assembly.
The gas assembly is just the gas block and gas tube. Keep in mind the gas block inner diameter needs to fit the diameter of your barrel. Also, your barrel will be spec for a certain length gas tube.
For more AR gas system info check out this AR Gas Systems article.
Here’s a video I made showing how to install the gas tube and gas block on an AR barrel:
The gas tube extends into the upper receiver an inch or so and inserts into the gas key on top of the BCG when the upper is completely assembled.
AR-15 Handguard Install
The handguard is really personal preference, that being said I like to look for a well built free-floating handguard. Stngr, Aero, or Midwest are good brands to start looking at.
Here’s a video I made showing how to install a free-floating handguard on an AR-15:
Now you can throw your BCG and charging handle in and check headspace.
How To Check Headspace On an AR-15
I always check headspace before firing a newly built rifle and will always recommend it. Anytime you put a new bolt and a new barrel together, you should check headspace.
That means if you swap out a barrel on an existing rifle, check headspace. Swap out a bolt on an existing rifle, check headspace.
The only time it might be ok to skip is when you buy a completed rifle or completed upper receiver because I would hope the manufacturer checks headspace before selling the firearm.
That being said, stuff gets through QC all the time that I wouldn’t think should, so maybe check headspace anyway.
Here’s a video I made showing how to check headspace on an AR-15:
Now all you need to do is mount an optic of some kind or iron sights and go shooting!
